
By Julie Heckman, Director of Data Engineering
Row based access policies are a true game changer for simplifying multi-tenant data sets and allowing accurate access to data for each tenant while maintaining the data in a single location or view. Put simply, think of them as filters for which rows a role is allowed to view and which rows they are not.
But how does this actually work? And what is the best practice for implementing them in Snowflake in a way that centralizes logic and makes deployment between environments simple and logical?
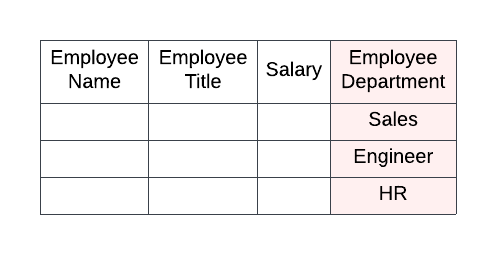
Step 1: Given a view or table, identify the column(s) that should be used in the filtering logic.
For this example, our table has a single column which tells the roles what they can and cannot see; the Employee Department is the column that determines which rows are visible to each role. Ideally this field is part of your existing data set and not something that you are adding on to make the permissions work.
Step 2: Create data and functional access roles
I like to separate data and functional access to allow roles to be building blocks to create access to data. So first I’ll create the role to access the data. This role should have usage on the database, schema and a warehouse and then select on both the view AND the reference view.
Decide on a naming convention pattern for the roles. In this example, we’ll create three roles – one for a Sales Manager, one for an Engineering Manager and one for an HR manager. Each of those roles has different rules as to which departments it can view.
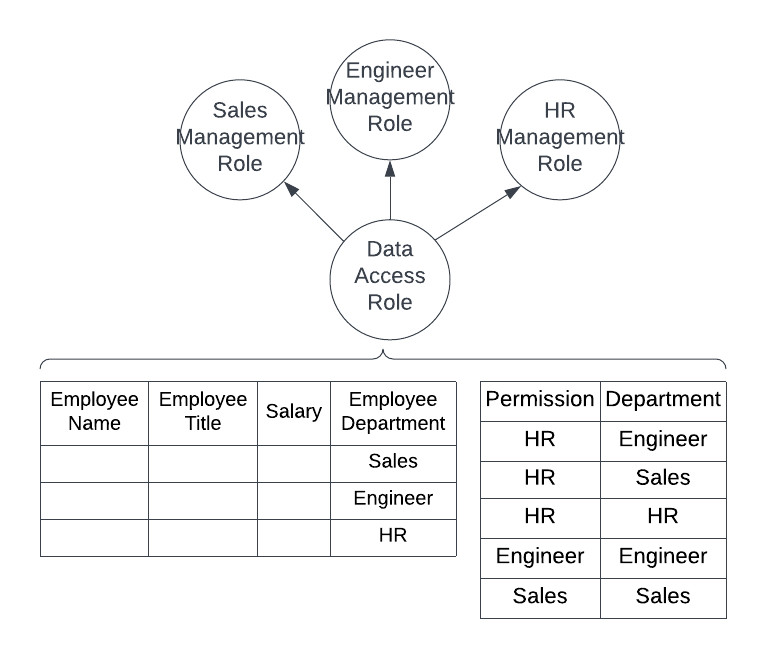
Pattern: RA_{DEPARTMENT CODE}_MANAGER
- RA_HR_MANAGER
- RA_SL_MANAGER
- RA_EG_MANAGER
Step 3: Create a reference table to house the mappings of the identifier column(s) that exists in the data to the role pattern code.
In this scenario, Sales and Engineering can only see their department but HR can see all of the departments.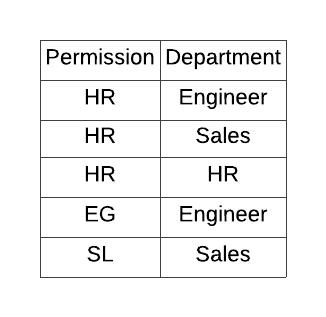
Step 4: Create and implement the row access policy.
The row access policy takes in the column from the table or view you’ve identified as input to the filtering logic AND can also query additional tables. The trick is that the roles need data access to the reference table as well as the view (show in diagram B above).
Also keep in mind that this policy can be added on any table or view where this filter applies.
create or replace row access policy dept_permissions as (dept varchar) returns boolean ->
    exists (
            select 1 from dept_permissions
              where
                current_role() = 'RA_' || permission || '_MANAGER'
                and department = dept
          );
Want to try this on your own? Here’s a github link to set up this tutorial.
Stay tuned for next week when I dive deeper into this by creating a more complicated rule using multiple columns for the filter logic!