
By Julie Heckman, Director of Data Engineering
Whenever an organization embarks on a journey into data warehousing, one of the first questions to arise is “how will we secure the data?” Securing data is a broad concept but I want to focus on confidential data and how to ensure that the architecture selected as well as the technology behind it meshes together to create an environment that promotes a simple method to securing confidential information. Snowflake’s dynamic data masking married with a data vault architecture is the perfect blend of technology + model that allows for secure fields to be completely separate but yet seamlessly integrated back into business consumption views and unmasked only for those individuals with appropriate privileges.
I’ve put together a simple example to show how this works.
Step 1: Use satellite splitting to ensure that all fields needing secure access reside in a separate satellite from standard access fields.
A Data Vault model allows a modeler to split out confidential attributes from standard attributes in two distinct satellites. We have chosen to suffix the tables with _SECURE and _STANDARD so that the tables can be easily recognized. This pattern also allows us to run queries against the Snowflake metadata to identify the columns from each of the _SECURE tabes in order to apply masking policies.

Step 2: Create a secure data access role that has the sole purpose of unmasking data in secure satellites.
A Snowflake best practice is to always grant SYSADMIN any custom roles so that there is a singular access point if necessary.
create role RAW_VAULT_SECURE_RO;
grant role RAW_VAULT_SECURE_RO to role SYSADMIN;
Step 3: Create generic data type masking policies that can be re-used across all secure satellite fields
Identify what data types exist in the secure satellite and looking here, we see INTEGER and TEXT. We do not want to mask any of the metadata fields like HKEY, LOAD_DATE, LOAD_CYCLE_ID, HASH_DIFF or DELETE_FLAG
We’ll need to create 2 masking functions, one for each data type. Decide how you want each data type to be masked. Here’s an example:
| Data Type | Mask |
| TEXT | ************* |
| INTEGER | -999999999 |
create or replace masking policy secure_mask_string as (val string) returns string ->
    case
        when is_role_in_session('RAW_VAULT_SECURE_RO') then val
        else ‘************’
    end;

create or replace masking policy secure_mask_numeric as (val numeric) returns numeric ->
    case
        when is_role_in_session('RAW_VAULT_SECURE_RO') then val
        else -999999999
    end;
Remember that a masking function lives inside a database and schema so for this example, I want the mask to live in the same database and schema where the hub and satellite tables reside.
Step 4: Apply masking rules to each field in the secure satellite (by data type and excluding data vault metadata fields).
I have found that this part lends itself easily to a simple python script to create the sql statements needed to apply each matching data type mask to the corresponding field. First create a csv file with each column name and data type.
import csv
FILE_NAME = ""
MASK_NAME = 'secure_mask'

sql = ""
cols_to_mask = csv.reader(open(FILE_NAME, 'r'))
for col in cols_to_mask:
    db = col[0]
    schema = col[1]
    table = col[2]
    col_name = col[3]
    data_type = col[4]
    sql += f"""
        alter table {db}.{schema}.{table} modify column {col_name} set masking policy {db}.{schema}.{MASK_NAME}_{data_type};
    """
print(sql)
Step 5: Build a single view to query the vault data.
SELECT
     HP.PERSON_BK,
     SPStandard.FIRST_NAME,
     SPStandard.LAST_NAME,
     SPSecure.U_VACCINATED,
     SPSecure.COVID_TESTING_RESULT
FROM
     HUB_PERSON HP
     INNER JOIN SAT_PERSON_STANDARD SPStandard on HP.PERSON_HKEY = SPStandard.PERSON_HKEY
     INNER JOIN SAT_PERSON_SECURE SPSecure on HP.PERSON_HKEY = SPSecure.PERSON_HKEY
Step 6: Create data access and functional roles to view the data.
In the example we’ve posed, this would simply be the following roles:
- Person Read Only Standard: allows read only access to the business view data with secure fields masked
- Person Read Only Secure: allows read only access to the business view data with secure fields unmasked because it also is granted the raw vault read only secure role
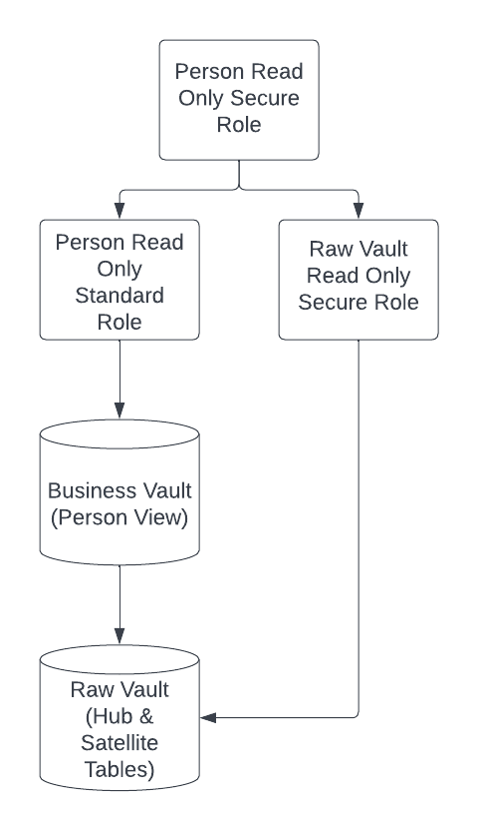 Step 7: Apply data roles + unmasking roles to functional roles allowing the view to be seen differently by both secure and standard users
Using the Person Read Only Standard role to execute the query in step 5, the following results return:
JCB@acme.org, Jim, Bryson, -999999999, *************
Using the Person Read Only Secure role to execute the query in step 5, the following results return:
JCB@acme.org, Jim, Bryson, 0, positive